If Service Host Local System constantly using CPU and has High Memory Usage on Windows 10/8/7, then you might want to know what is service host local system?
Here we have explained the 5 best solution to fix service host local system high disk usages issues. With these solution you can pick up a right fix to stop Service Host Local System high disk usage, CPU usage, memory usage or too much network bandwidth.
Stick with this post if you have following queries in your mind
- Can I end service host local system?
- What is service host local system in Windows 10?
- Is Service host a virus?
- What does service host local system do?
- How do I permanently disable service host local system high disk usage?
Related: How To Fix System Thread Exception Not Handled Blue Screen Error
What is svchost.exe Service Host Local System (Network Restricted)?
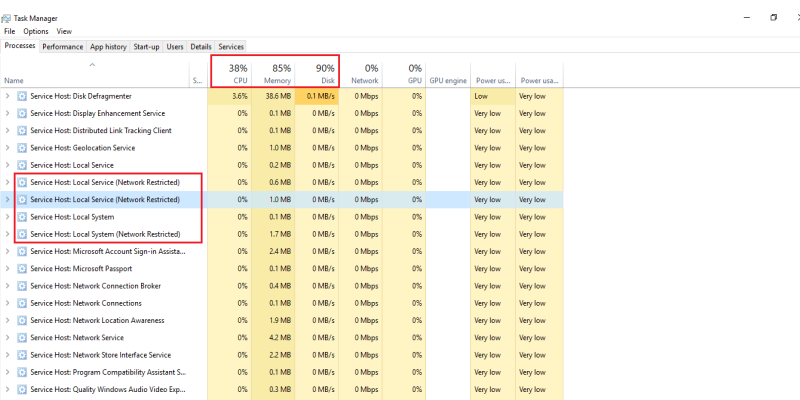
Many users complain that service host is consuming 99 disk usage in windows 10. If you are one of them then press Ctrl+Alt+Del key and open task manager you will notice service host local system high disk issue.
Now click on process tab and scroll down a bit, here you will find a lot of processes with the name of service host local system related terms.
You will see service host: local system (network restricted), service host: local service, service host: network service, etc. It is the only process which causes Windows 10 100% disk usage in Task Manager.
The service host local system is generic service hosting container. It has bundle of processes running in it. These process includes Windows Autos Updates and many other process which uses huge disk,CPU, memory, RAM.
Most of the time when users update Windows 10 they started to face service host local system high disk usage problem.
Related: Why Modern Setup Host eating up high CPU usage? How To Fix It?
How To Fix Service Host Local System High Disk Usage, CPU Usage or Memory Usage?
Try these simple easy to apply fixes and get rid of service host local system high disk usage in Windows 10/8/7.
1. Disable Superfetch Service
You can start by disabling superfetch service. It decreases boot time and increases efficiency of must load programs. At the same time this superfetch is another cause of generating service host local system high disk usage issue. To stop superfetch service.
- On Win 10 press Windows key and type Command Prompt from your keyboard. Then right click on it to run as administrator.
- Once black windows appears type this command net.exe stop superfetch and press the Enter.

- It will disable superfetch but it takes some time so wait for a few minutes.
- We recommend that you should also run check disk command to san and fix any possible error. For that type this command chkdsk.exe /f /r and press Enter.
- Now press Y and wait for at least 15 minutes.

It will resolve service host local system high disk usage problem from your Windows 10/8/7 PC. If not then proceed to the second solution.
2. Troubleshoot Windows Update
Sudden shutdown during Windows update also cause service host local system high disk or CPU usage. To fix it you need to run Windows update troubleshooter available in control panel. Follow these steps;
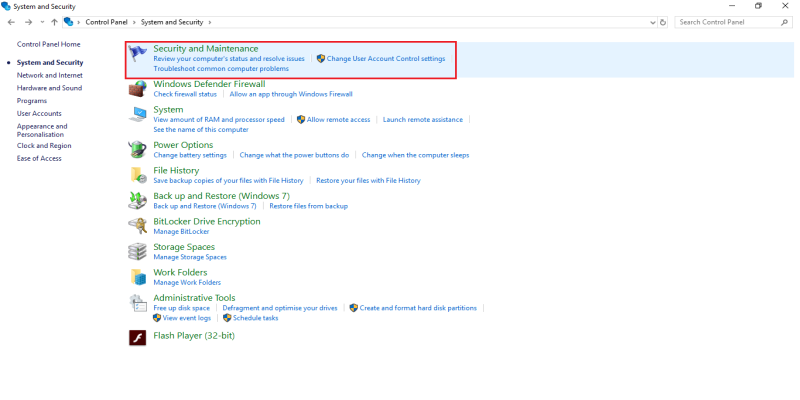
- Press Win + R key and type control panel, hit enter.
- Click on System and Security then click on Security and Maintenance.

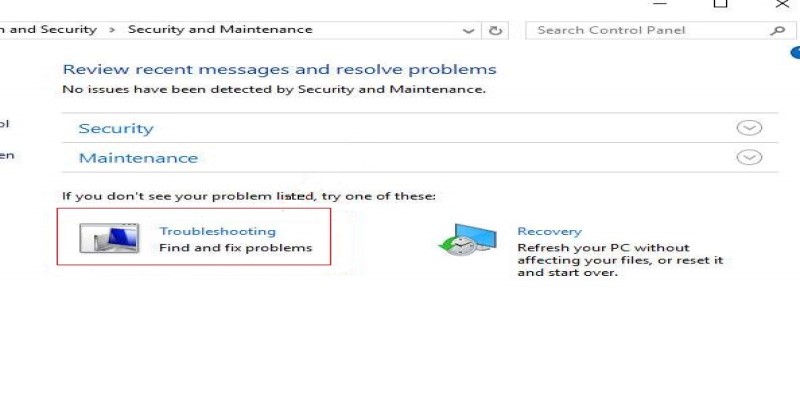
- You will see two options Troubleshooting and recovery clink on the first one.
- Now click Fix problems with Windows Update, then click Next.
- Choose the option asking you to Try troubleshooting as an administrator.
- Alternatively on Win 10 PCs, Press Win + I to open setting, Click Update & security then click on Troubleshoot and finally click on Windows Update button.
- Now restart your computer
Hopefully, it will solve service host local system high disk or CPU usage on Windows 10/8/7. This should be able to help you fix the problem. If not, please restart your computer and try the next step.
Related: Kernel Security Check Failure error in Windows 10/7- How We Fixed It?
3. Disable Backup Intelligent Transfer Service And Windows Update Service
As already said that svchost.exe service host: local system (network restricted) is a bundle of process. If you find the culprit process in task manager then you can disable them to make a difference.
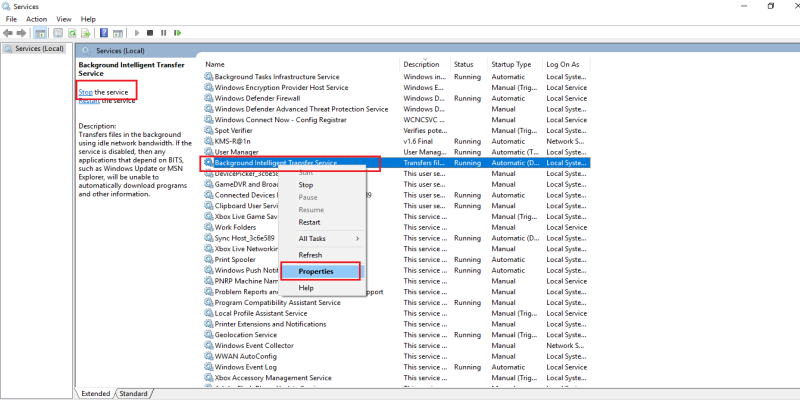
- Open Windows Task Manager and click on Services tab.
- At the bottom of Services tab, you will find Open Services button. Click on it.[adlinkma]
- A new Window with a huge list will open. Press “B” to find service called Background Intelligent Transfer Service.
- Right click on it and click Stop.
- Again press “W” to locate Windows Update service. Right click on it to open Properties and then click on General tab.
- Here you will see Startup Type option. Click on it to select Disable, then press OK to apply changes.
- After disabling Windows update, open task manager locate service host local system network restricted. Right click and select end task.
4. Run Built-in SFC and DISM Windows Utility
The system file checker and deployment image & servicing management are two main tool in Windows 10 which can help you solve service host local system high disk usage problem.
First run DISM and then SFC to properly fix any Windows error. Follow these steps;
- Press Win key and type command prompt, right click on it to run it as admin.
- When command prompt window appears type this command DISM /Online /Cleanup-Image /RestoreHealth and hit Enter.
- Now wait for a minute until whole process finishes.
- Now restart your PC and run SFC in command prompt. [adlinkma]
- To run system file checker again open command prompt (admin) and type this command sfc /scannow hit enter.
- Wait until scanning process finishes. If you see Windows Resource Protection did not find any integrity violations then everything is fine.
- If you see Windows Resource Protection found corrupt files but was unable to fix some of them then run your PC in Safe mode and run system file checker again.
Its a universal fix which will stop service host local system high disk usage problem. In case service host local system high disk issue is still there then you try this last method.
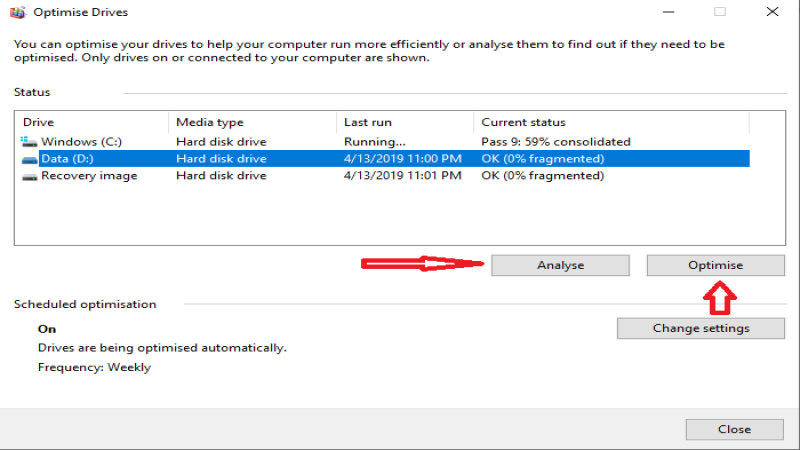
5. Restore hard drive health and optimize system
This is the last solution to fix service host local system high disk. In order to fix this problem you need to run chkdsk then Perform Defragmentation.
- To run chkdsk open Command Prompt (admin), now decide which drive you want to check
- Usually users type chkdsk c: to check it and press Enter.
- The scanning process will start. It will show any error message if found and at the same time will fix all errors.
- Now its time to run Defragment and Optimize Drivers utility.

- On Win 10 press win key and types optimize drivers right click on it to run as admin.
- Select the hard drive and click Analyze. Check the percentage of fragmented files
- Now click on Optimize button, If you want to defragment your drive
Related: What is Vulkan Runtime Libraries? Should I Remove It or Keep It?
This is how we stop service host local system high disk problem on Win 10 PC. If you have any other solution to fix service host local system high disk then tell us we will include it in our article.